在线电子词典应用实训项目
1 项目概述

本实训案例旨在构建一款,可运行于鸿蒙手机、平板电脑、智慧屏乃至智能手表设备上的,电子词典应用。借助该应用,用户可以输入任何英语单词,并查询到相应的词性及中文解释。通过本实训案例,学生可以快速掌握基于Java UI框架的鸿蒙应用开发,并对鸿蒙平台上的数据库操作、网络访问、多设备适配,以及离线与在线方式的数据挖掘技术有一个初步的体验和认知。
2 需求分析
2.1 词典功能
输入英语单词,输出中文解释。
2.2 本地查词
利用爬虫技术构建轻量级本地词库,并作为资源的一部分与应用一起部署到设备端。应用优先在本地词库中查询单词,提高查询速度。
2.3 远程查词
对于本地词库没有的单词,同样利用爬虫技术在远程词库中查询,在向用户显示查询结果的同时,将其存入本地词库,动态扩展词库。
3 核心技术
3.1 多设备适配技术
同一套程序支持在多种设备上运行:
- 手机
- 平板电脑
- 智慧屏
- 智能手表
3.2 网络爬虫技术
利用爬虫技术构建本地词库。
3.3 关系型数据库技术
将本地词库保存在SQLite数据库中。
3.4 网络通信技术
通过网络访问Web服务器上的资源。
3.5 数据挖掘技术
从复杂的网页信息中挖掘出感兴趣的关键内容并将其结构化。
4 开发步骤
4.1 创建跨设备工程
通过DevEco Studio创建工程,选择Empty Ability(Java)模板,并在设备类型中同时勾选Phone、Tablet、TV和Wearable。
在entry\src\main\config.json文件中可以看到:
"deviceType": [
  "phone",
  "tablet",
  "tv",
  "wearable"
]
在中英文字符串资源文件中修改应用的标签和描述。
entry\src\main\resources\en\element\string.json:
{
  "string": [
    {
      "name": "entry_MainAbility",
      "value": "Dictionary"
    },
    {
      "name": "mainability_description",
      "value": "Online Electronic Dictionary"
    },
    {
      "name": "mainability_HelloWorld",
      "value": "Hello World"
    }
  ]
}
entry\src\main\resources\zh\element\string.json:
{
  "string": [
    {
      "name": "entry_MainAbility",
      "value": "词典"
    },
    {
      "name": "mainability_description",
      "value": "在线电子词典"
    },
    {
      "name": "mainability_HelloWorld",
      "value": "你好,世界"
    }
  ]
}
4.2 设计界面布局
4.2.1 为不同设备编写布局脚本
在entry\src\main\resources\base\graphic目录下创建background_textfield.xml文件,为单词编辑框定义背景样式:
<?xml version="1.0" encoding="UTF-8" ?>
<shape xmlns:ohos="http://schemas.huawei.com/res/ohos"
       ohos:shape="rectangle">
    <solid ohos:color="#ffffff"/>
    <stroke ohos:width="1vp" ohos:color="#4fa5d5"/>
</shape>
将搜索图片search.png放到entry\src\main\resources\base\media目录下:

将封面图片cover.png放到entry\src\main\resources\base\media目录下:

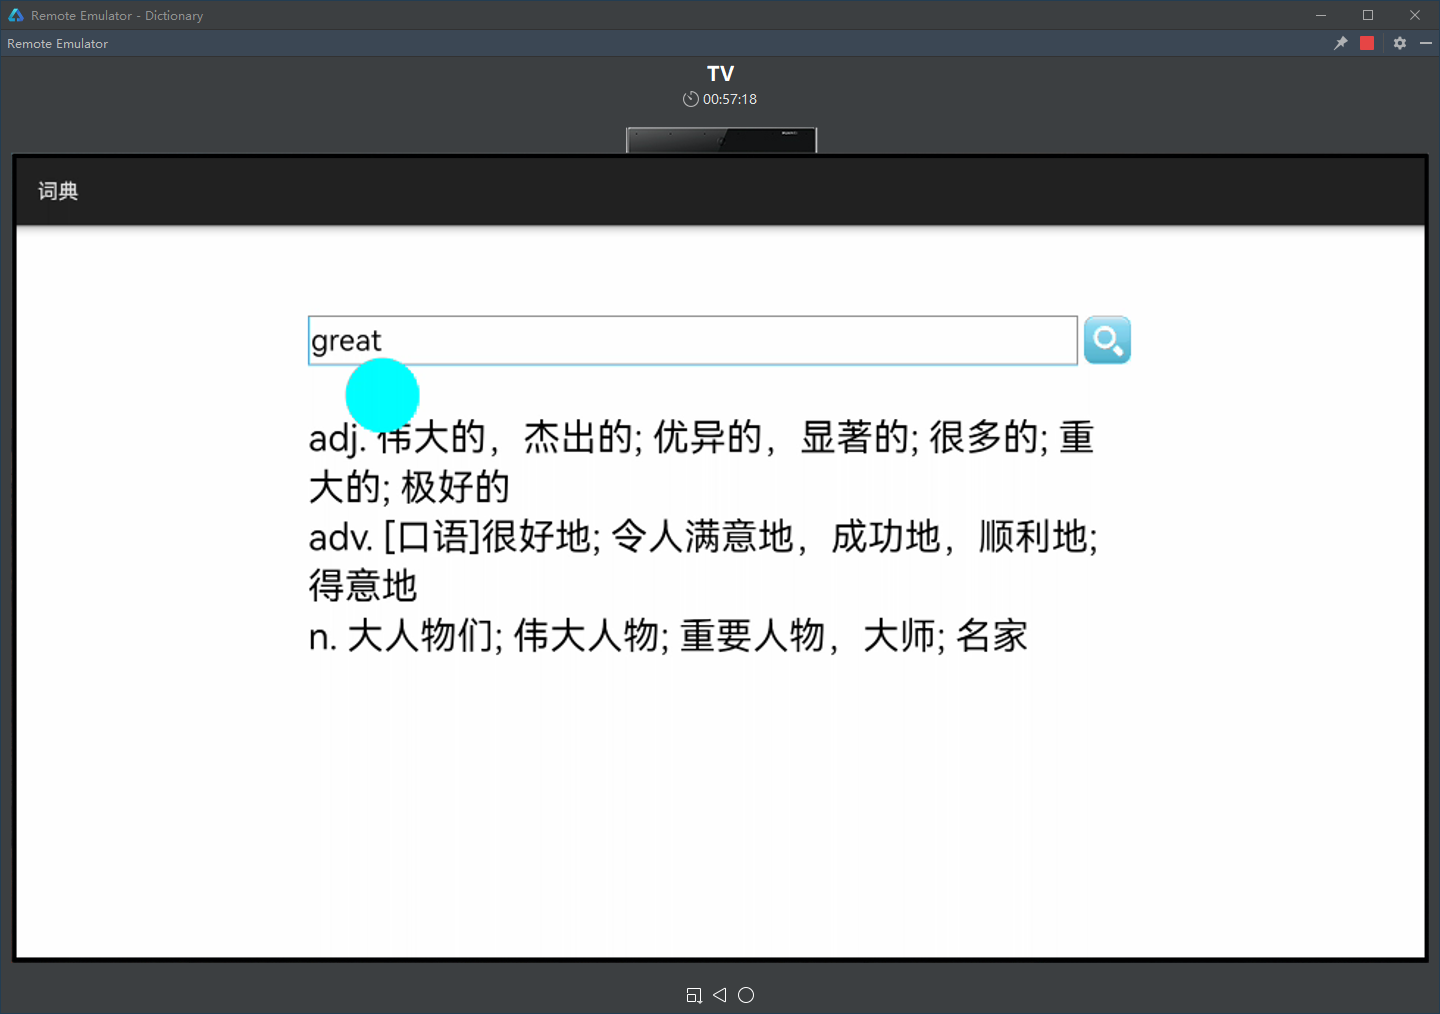
电视布局entry\src\main\resources\base\layout\ability_main_tv.xml:
<DirectionalLayout
    xmlns:ohos="http://schemas.huawei.com/res/ohos"
    ohos:height="match_parent"
    ohos:width="match_parent"
    ohos:left_padding="200vp"
    ohos:right_padding="200vp"
    ohos:top_padding="60vp"
    ohos:bottom_padding="60vp"
    ohos:orientation="vertical">

    <DirectionalLayout
        ohos:height="match_content"
        ohos:width="match_parent"
        ohos:alignment="center"
        ohos:orientation="horizontal">

        <TextField
            ohos:id="$+id:tfWord"
            ohos:height="match_content"
            ohos:width="match_parent"
            ohos:weight="1"
            ohos:padding="2vp"
            ohos:background_element="$graphic:background_textfield"
            ohos:hint="输入要查询的单词"
            ohos:text_size="20fp"
            />

        <Image
            ohos:id="$+id:imgSearch"
            ohos:height="32vp"
            ohos:width="32vp"
            ohos:left_margin="4vp"
            ohos:image_src="$media:search"
            ohos:scale_mode="zoom_center"
            />

    </DirectionalLayout>

    <DependentLayout
        ohos:height="match_parent"
        ohos:width="match_parent"
        ohos:top_margin="30vp">

        <Text
            ohos:id="$+id:txtResult"
            ohos:height="match_content"
            ohos:width="match_parent"
            ohos:multiple_lines="true"
            ohos:text_size="25fp"
            />

        <Image
            ohos:id="$+id:imgCover"
            ohos:height="match_content"
            ohos:width="match_content"
            ohos:center_in_parent="true"
            ohos:align_parent_bottom="true"
            ohos:image_src="$media:cover"
            />

    </DependentLayout>

</DirectionalLayout>
预览效果如下图所示:
平板布局entry\src\main\resources\base\layout\ability_main_tablet.xml:
<DirectionalLayout
    xmlns:ohos="http://schemas.huawei.com/res/ohos"
    ohos:height="match_parent"
    ohos:width="match_parent"
    ohos:padding="100vp"
    ohos:orientation="vertical">

    <DirectionalLayout
        ohos:height="match_content"
        ohos:width="match_parent"
        ohos:alignment="center"
        ohos:orientation="horizontal">

        <TextField
            ohos:id="$+id:tfWord"
            ohos:height="match_content"
            ohos:width="match_parent"
            ohos:weight="1"
            ohos:padding="2vp"
            ohos:background_element="$graphic:background_textfield"
            ohos:hint="输入要查询的单词"
            ohos:text_size="20fp"
            />

        <Image
            ohos:id="$+id:imgSearch"
            ohos:height="32vp"
            ohos:width="32vp"
            ohos:left_margin="4vp"
            ohos:image_src="$media:search"
            ohos:scale_mode="zoom_center"
            />

    </DirectionalLayout>

    <DependentLayout
        ohos:height="match_parent"
        ohos:width="match_parent"
        ohos:top_margin="30vp">

        <Text
            ohos:id="$+id:txtResult"
            ohos:height="match_content"
            ohos:width="match_parent"
            ohos:multiple_lines="true"
            ohos:text_size="25fp"
            />

        <Image
            ohos:id="$+id:imgCover"
            ohos:height="match_content"
            ohos:width="match_content"
            ohos:center_in_parent="true"
            ohos:align_parent_bottom="true"
            ohos:image_src="$media:cover"
            />

    </DependentLayout>

</DirectionalLayout>
预览效果如下图所示:
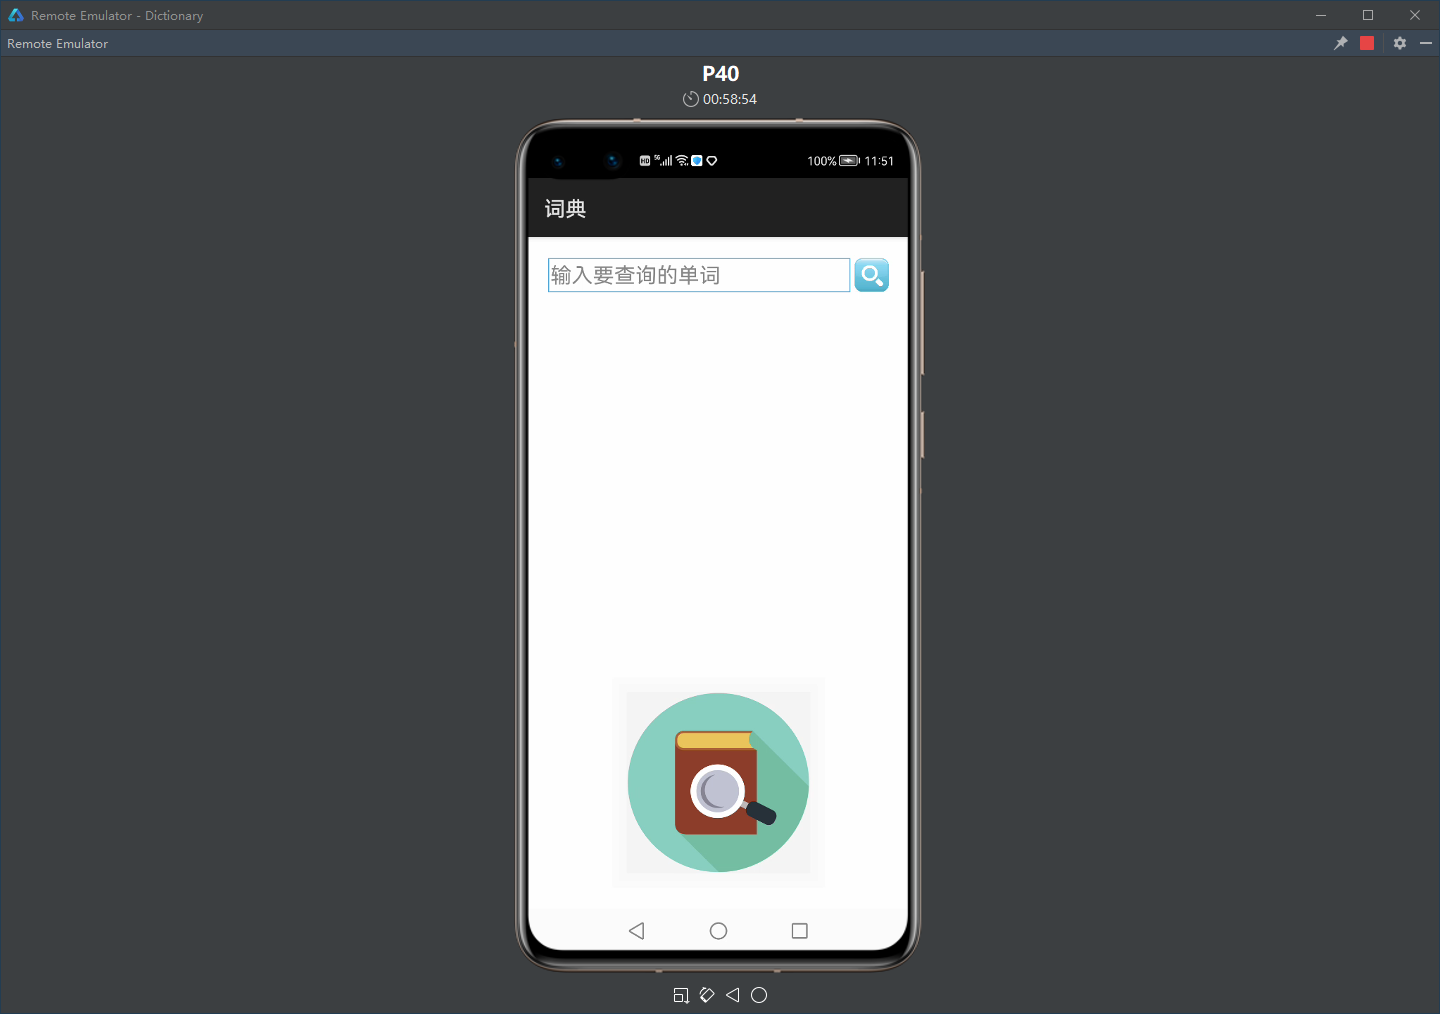
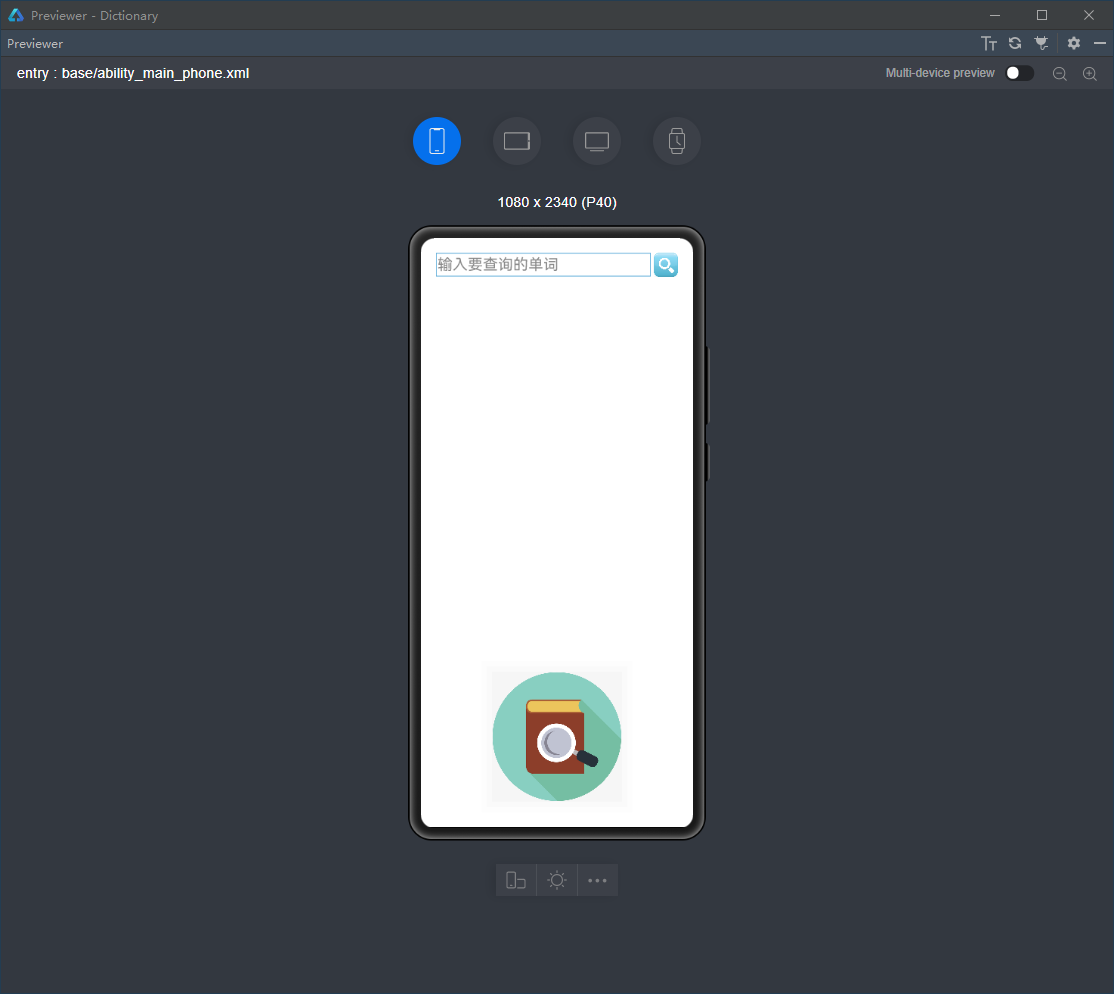
手机布局entry\src\main\resources\base\layout\ability_main_phone.xml:
<DirectionalLayout
    xmlns:ohos="http://schemas.huawei.com/res/ohos"
    ohos:height="match_parent"
    ohos:width="match_parent"
    ohos:padding="20vp"
    ohos:orientation="vertical">

    <DirectionalLayout
        ohos:height="match_content"
        ohos:width="match_parent"
        ohos:alignment="center"
        ohos:orientation="horizontal">

        <TextField
            ohos:id="$+id:tfWord"
            ohos:height="match_content"
            ohos:width="match_parent"
            ohos:weight="1"
            ohos:padding="2vp"
            ohos:background_element="$graphic:background_textfield"
            ohos:hint="输入要查询的单词"
            ohos:text_size="20fp"
            />

        <Image
            ohos:id="$+id:imgSearch"
            ohos:height="32vp"
            ohos:width="32vp"
            ohos:left_margin="4vp"
            ohos:image_src="$media:search"
            ohos:scale_mode="zoom_center"
            />

    </DirectionalLayout>

    <DependentLayout
        ohos:height="match_parent"
        ohos:width="match_parent"
        ohos:top_margin="30vp">

        <Text
            ohos:id="$+id:txtResult"
            ohos:height="match_content"
            ohos:width="match_parent"
            ohos:multiple_lines="true"
            ohos:text_size="25fp"
            />

        <Image
            ohos:id="$+id:imgCover"
            ohos:height="match_content"
            ohos:width="match_content"
            ohos:center_in_parent="true"
            ohos:align_parent_bottom="true"
            ohos:image_src="$media:cover"
            />

    </DependentLayout>

</DirectionalLayout>
预览效果如下图所示:
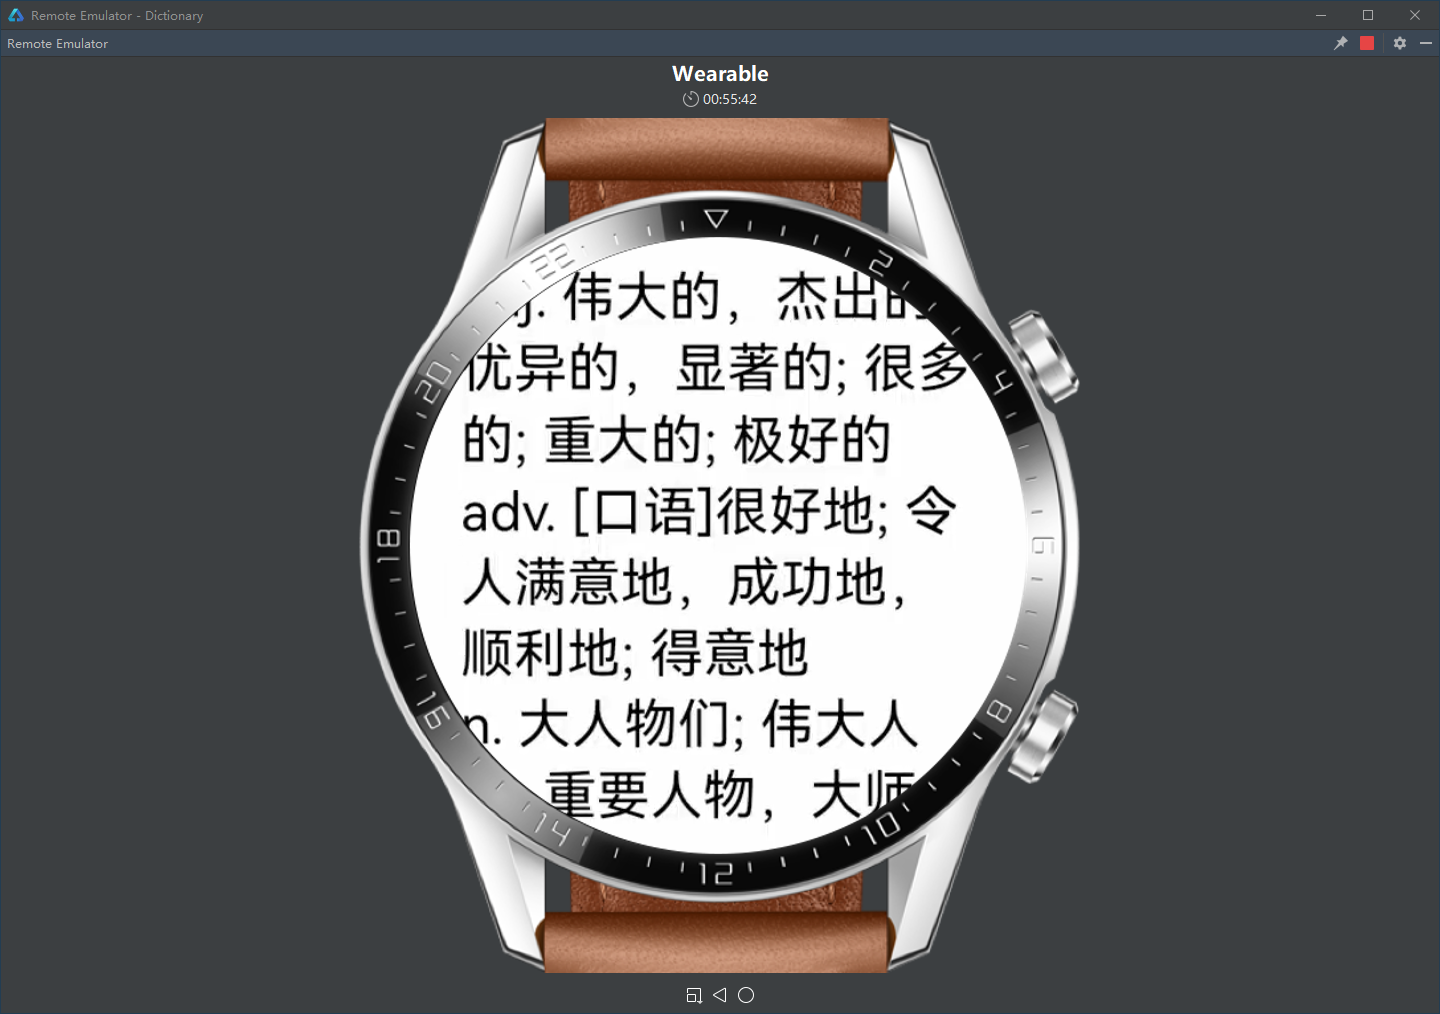
考虑到智能手表屏幕通常较小,同屏显示被查单词和查询结果会非常局促,因此采用分屏显示的方法。
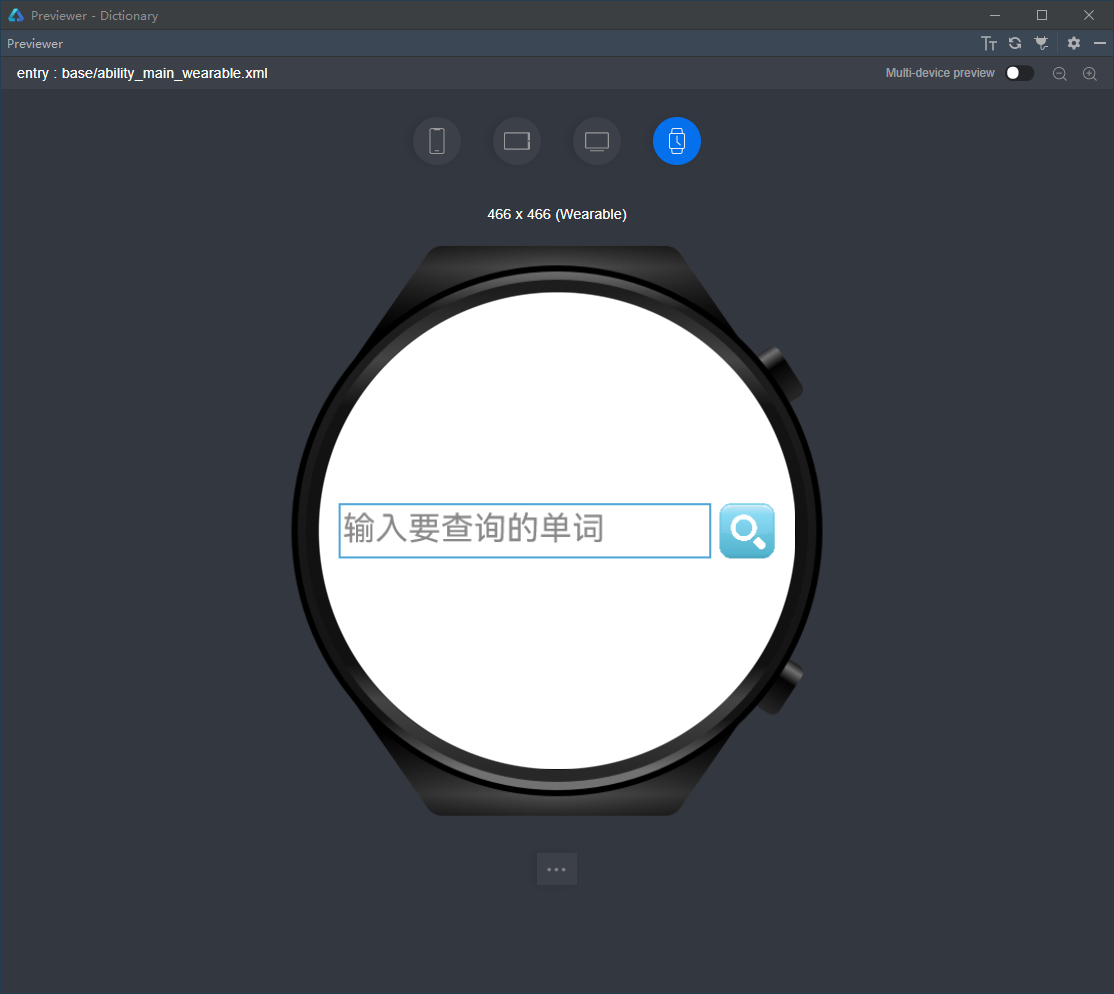
手表查询页面布局entry\src\main\resources\base\layout\ability_main_wearable.xml:
<DirectionalLayout
    xmlns:ohos="http://schemas.huawei.com/res/ohos"
    ohos:height="match_parent"
    ohos:width="match_parent"
    ohos:left_padding="10vp"
    ohos:right_padding="10vp"
    ohos:alignment="center"
    ohos:orientation="horizontal">

    <TextField
        ohos:id="$+id:tfWord"
        ohos:height="match_content"
        ohos:width="match_parent"
        ohos:weight="1"
        ohos:padding="2vp"
        ohos:background_element="$graphic:background_textfield"
        ohos:hint="输入要查询的单词"
        ohos:text_size="16fp"
        />

    <Image
        ohos:id="$+id:imgSearch"
        ohos:height="27vp"
        ohos:width="27vp"
        ohos:left_margin="4vp"
        ohos:image_src="$media:search"
        ohos:scale_mode="zoom_center"
        />

</DirectionalLayout>
预览效果如下图所示:
手表结果页面布局entry\src\main\resources\base\layout\ability_result_wearable.xml:
<DirectionalLayout
    xmlns:ohos="http://schemas.huawei.com/res/ohos"
    ohos:height="match_parent"
    ohos:width="match_parent">

    <ScrollView
        ohos:height="match_parent"
        ohos:width="match_parent"
        ohos:rebound_effect="true">

        <Text
            ohos:id="$+id:txtResult"
            ohos:height="match_content"
            ohos:width="match_parent"
            ohos:margin="20vp"
            ohos:layout_alignment="center"
            ohos:multiple_lines="true"
            ohos:text_size="20fp"
            />

    </ScrollView>

</DirectionalLayout>
4.2.2 根据设备类型适配界面布局
entry\src\main\java\com\minwei\dictionary\slice\MainAbilitySlice.java:
public class MainAbilitySlice extends AbilitySlice {
    @Override
    public void onStart(Intent intent) {
        ...
        switch (DeviceInfo.getDeviceType()) {
            case "tv":
                super.setUIContent(
                    ResourceTable.Layout_ability_main_tv);
                break;
            case "tablet":
                super.setUIContent(
                    ResourceTable.Layout_ability_main_tablet);
                break;
            case "wearable":
                super.setUIContent(
                    ResourceTable.Layout_ability_main_wearable);
                break;
            default:
                super.setUIContent(
                    ResourceTable.Layout_ability_main_phone);
                break;
        }
    }
    ...
}
4.3 构建本地词库
 ____________
|            |
| Web Server |
|____________|
       |HTTP
 ______v_____
|            |
| Web Spider |
|____________|
       |SQL
 ______v_____      ____________
|            |    |            |
| SQLite  DB |--->|     HAP    |
|____________|    |____________|
安装Python解释器和扩展工具包:
https://www.python.org/downloads
> python -m pip install requests
> python -m pip install beautifulsoup4
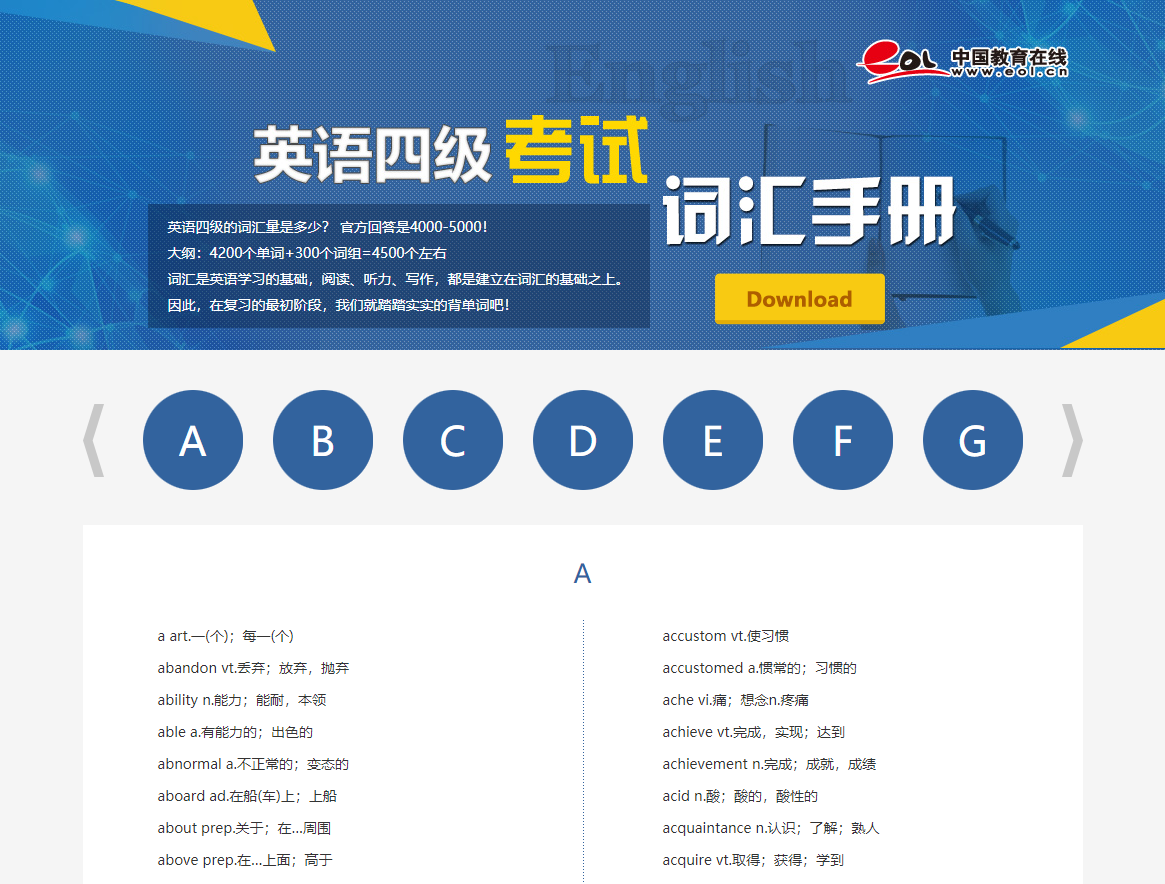
CET4的页面如下图所示:
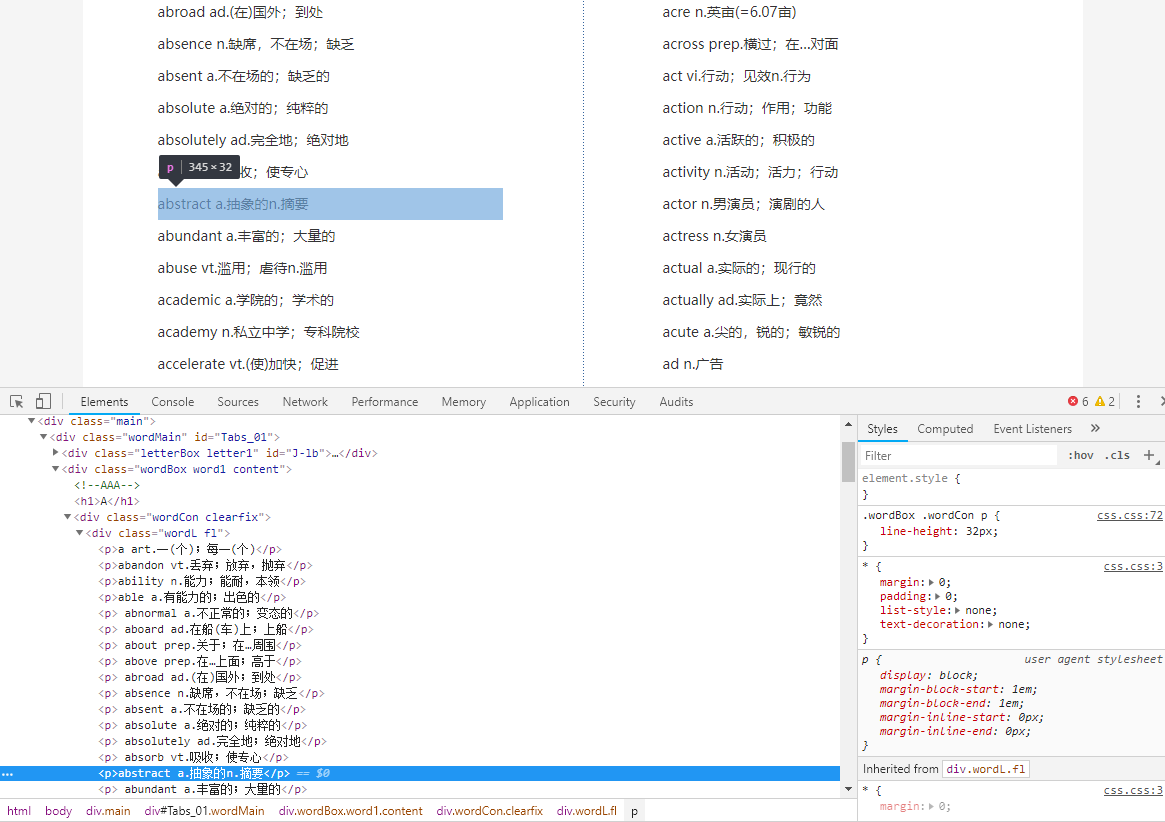
CET4的页面元素如下图所示:
from bs4 import BeautifulSoup
import requests
import re
import os
import sqlite3

print("下载词典数据 ... ", end = "");

# 获取英语四级考试词汇手册页面内容
response = requests.get("https://www.eol.cn/html/en/cetwords/cet4.shtml")
content = str(response.content, "utf-8")

print("成功!");
print("抽取词典数据 ... ", end = "");

# 获取页面内容中的字头集
bs = BeautifulSoup(content, "html.parser")
initials = bs.find_all(attrs = {"class": "wordL fl"})

words = {} # 单词字典(单词:词义字典)

# 遍历字头集中的每一个字头
for initial in initials:
    # 获取字头下的词条集
    entries = initial.select("p")

    # 遍历词条集中的每一个词条
    for entry in entries:
        # 以词性作为正则匹配模式
        pattern = re.compile("[a-z]+\.[a-z\.&\s]*")
        # 从词条中抽取所有的词性
        part_of_speeches = pattern.findall(entry.text)

        # 以词性为分隔符拆分词条
        fragments = re.split("[a-z]+\.[a-z\.&\s]*", entry.text)
        # 词条中第一个片段是单词
        word = fragments[0].strip();

        meanings = {} # 词义字典(词性:词义)

        # 遍历所有的词性
        for i in range(0, len(part_of_speeches)):
            # 词性
            part_of_speech = part_of_speeches[i].strip()
            # 词义
            meaning = fragments[i+1].strip()
            # 词义字典(词性:词义)
            meanings[part_of_speech] = meaning

        # 单词字典(单词:词义字典)
        words[word] = meanings;

print("成功!");
print("创建本地词库 ... ", end = "");

# 删除已有的数据库文件
database = "lexicon.sqlite"
if os.path.exists(database):
    os.remove(database)

# 连接数据库
connect = sqlite3.connect(database)
cursor = connect.cursor()

# 创建表
cursor.execute('''
    create table t_words (
        id integer primary key autoincrement not null,
        word varchar(30) not null,
        part_of_speech varchar(30) not null,
        meaning text not null)''')
# 创建索引
cursor.execute('''
    create index word_index on t_words(word)''')

print("成功!");
print("保存词典数据 ... ", end = "");

# 将单词字典存入数据库
for word, meanings in words.items():
    for part_of_speech, meaning in meanings.items():
        cursor.execute(f'''
            insert into t_words(word, part_of_speech, meaning)
            values ("{word}", "{part_of_speech}", "{meaning}")''')

# 提交数据库
connect.commit()
# 关闭数据库
connect.close()

print("成功!");
执行Python爬虫脚本,得到本地词库:
> python lexicon.py
将本地词库文件lexicon.sqlite文件拷贝到entry\src\main\resources\rawfile目录下,成为
应用资源的一部分。
4.4 抽取本地词库
将本地词库从应用资源中抽取出来,放到数据库目录下。为此,添加common包,并在common包中添加Search类:
public class Search {
    private final AbilityContext context;
    private final File lexicon;

    public Search(AbilityContext context) {
        this.context = context;

        File dir = new File(context.getDataDir() +
            "/MainAbility/databases/db");
        if (!dir.exists())
            dir.mkdirs();
        lexicon = new File(Paths.get(dir.toString(),
            "lexicon.sqlite").toString());
    }

    public void init() throws IOException {
        extract();
    }

    private void extract() throws IOException {
        if (lexicon.exists())
            lexicon.delete();

        Resource res = context.getResourceManager().getRawFileEntry(
            "resources/rawfile/lexicon.sqlite").openRawFile();
        FileOutputStream fos = new FileOutputStream(lexicon);

        byte[] buffer = new byte[4096];
        int count;
        while ((count = res.read(buffer)) >= 0)
            fos.write(buffer, 0, count);

        fos.close();
        res.close();
    }
}
在MainAbilitySlice类的onStart()方法中抽取本地词库:
public class MainAbilitySlice extends AbilitySlice {
    private Search search;

    @Override
    public void onStart(Intent intent) {
        ...
        search = new Search(this);
        try {
            search.init();
        }
        catch (IOException exception) {
            terminateAbility();
        }
    }
    ...
}
4.5 响应点击“搜索”
在MainAbilitySlice类的onStart()方法中,为“搜索”图像添加点击事件处理:
public class MainAbilitySlice extends AbilitySlice {
    ...
    private TextField tfWord;
    private Image imgSearch;
    private Text txtResult;
    private Image imgCover;

    @Override
    public void onStart(Intent intent) {
        ...
        tfWord = (TextField)findComponentById(
            ResourceTable.Id_tfWord);
        imgSearch = (Image)findComponentById(
            ResourceTable.Id_imgSearch);
        txtResult = (Text)findComponentById(
            ResourceTable.Id_txtResult);
        imgCover = (Image)findComponentById(
            ResourceTable.Id_imgCover);

        imgSearch.setClickedListener( component -> {
            if (imgCover != null)
                imgCover.setVisibility(Component.HIDE);
        });
    }
    ...
}
4.6 打开本地词库
在Search类中添加:
public class Search {
    ...
    private final StoreConfig config =
        StoreConfig.newDefaultConfig("lexicon.sqlite");
    private static final RdbOpenCallback callback =
        new RdbOpenCallback() {
            @Override
            public void onCreate(RdbStore rdbStore) {

            }

            @Override
            public void onUpgrade(RdbStore rdbStore, int i, int i1) {

            }
        };
    private RdbStore store;
    ...
    public void init() throws IOException {
        ...
        store = new DatabaseHelper(context).getRdbStore(
            config, 1, callback, null);
    }
    ...
}
store将用于后续对本地词库的访问。
4.7 查询本地词库
在common包中添加Entry类:
public class Entry {
    private String partOfSpeech;
    private String meaning;

    public Entry(String partOfSpeech, String meaning) {
        this.partOfSpeech = partOfSpeech;
        this.meaning = meaning;
    }

    public String getPartOfSpeech() {
        return partOfSpeech;
    }

    public String getMeaning () {
        return meaning;
    }
}
为Search类添加local()方法:
public class Search {
    ...
    public List<Entry> local(String word) {
        List<Entry> result = new ArrayList<>();

        ResultSet resultSet = store.querySql(
            "select part_of_speech, meaning from t_words where word=?",
            new String[] {word.toLowerCase()});
        while (resultSet.goToNextRow())
            result.add(new Entry(resultSet.getString(0),
                resultSet.getString(1)));
        resultSet.close();

        return result;
    }
    ...
}
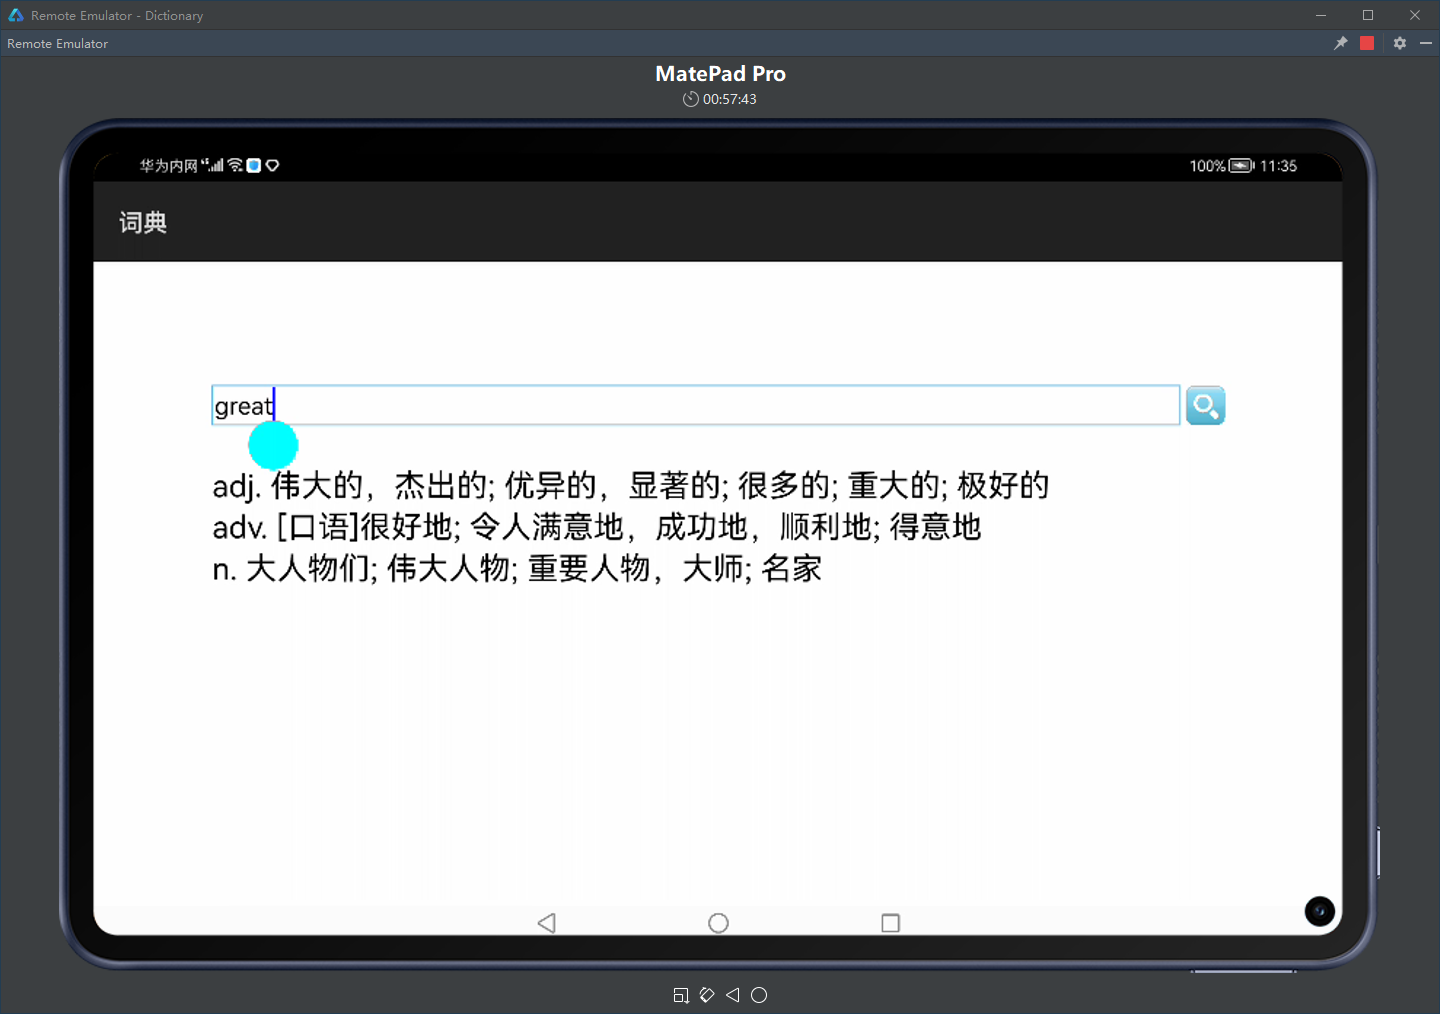
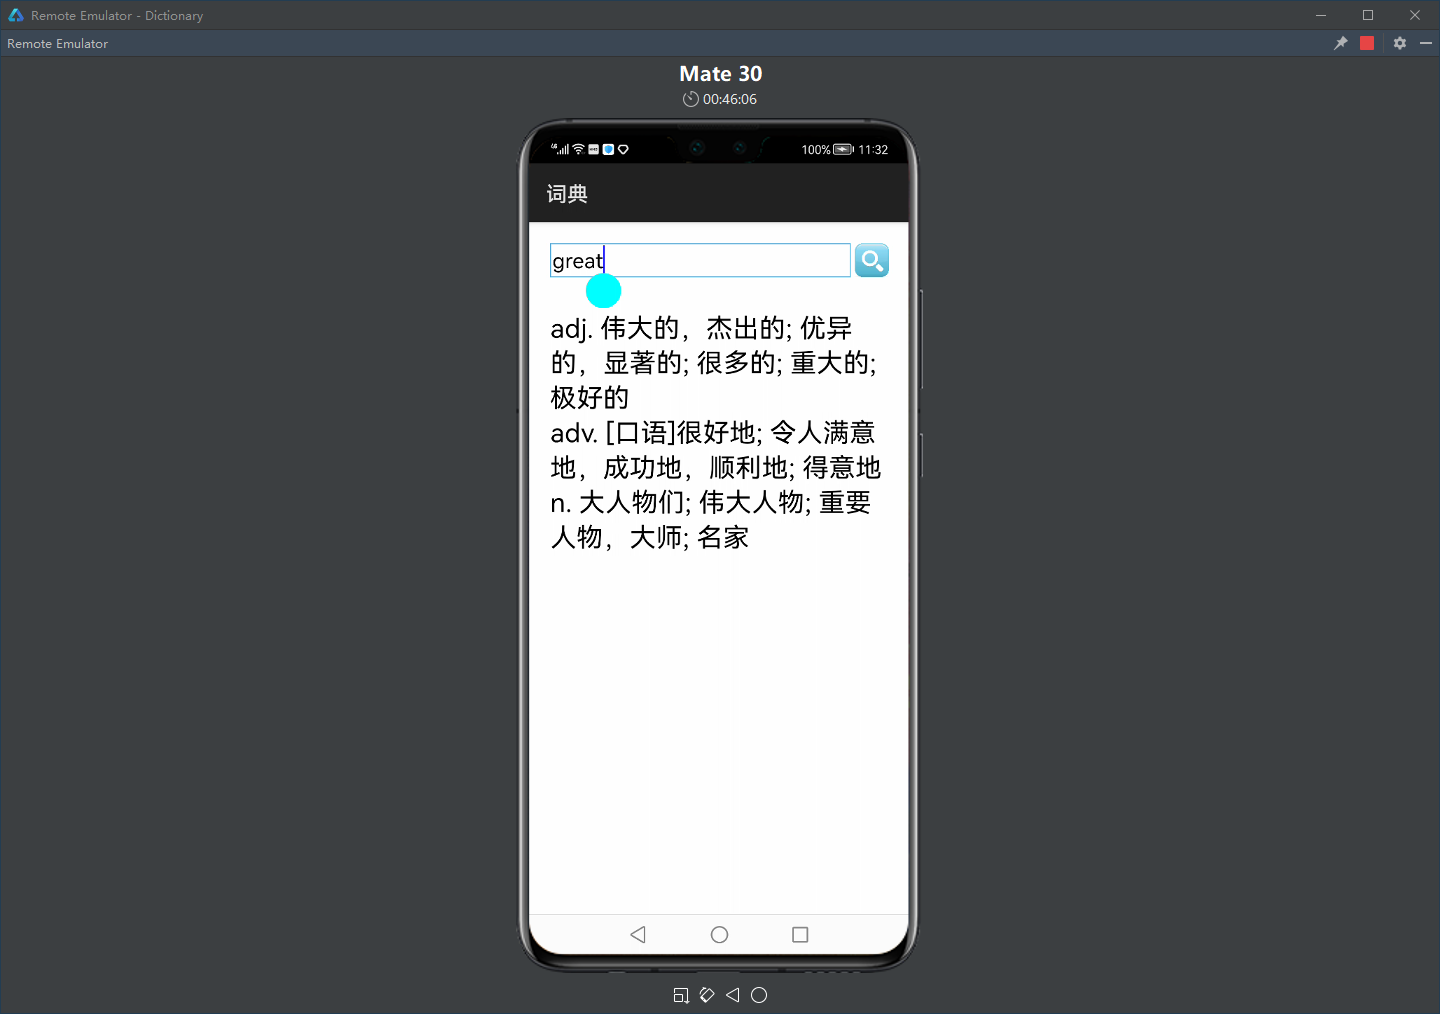
在MainAbilitySlice类的onStart()方法中,为“搜索”图像的点击事件处理添加本地查词功能:
public class MainAbilitySlice extends AbilitySlice {
    ...
    @Override
    public void onStart(Intent intent) {
        ...
        imgSearch.setClickedListener(component -> {
            if (imgCover != null) {
                ...
                List<Entry> result = search.local(
                    tfWord.getText());
                if (!result.isEmpty()) {
                    txtResult.setText("");
                    for (Entry entry : result)
                        txtResult.append(entry.getPartOfSpeech() + " " +
                            entry.getMeaning() + "\n");
                }
                else
                    txtResult.setText("很遗憾,没查到。╮(╯ɛ╰)╭");
            }
        });
    }
    ...
}
4.8 查询线程与结果回调
在common包中添加ResultCallback接口:
public interface ResultCallback {
    void onResult(List<Entry> result);
}
在common包中添加SearchThread类:
public class SearchThread extends Thread {
    private String word;
    private RdbStore store;
    private ResultCallback callback;

    public SearchThread(String word, RdbStore store,
        ResultCallback callback) {
        this.word = word;
        this.store = store;
        this.callback = callback;
    }

    @Override
    public void run() {
    }
}
4.9 实现查询线程过程
将jsoup包复制到entry\src\main\java\org\jsoup。
爱词霸的页面如下图所示:
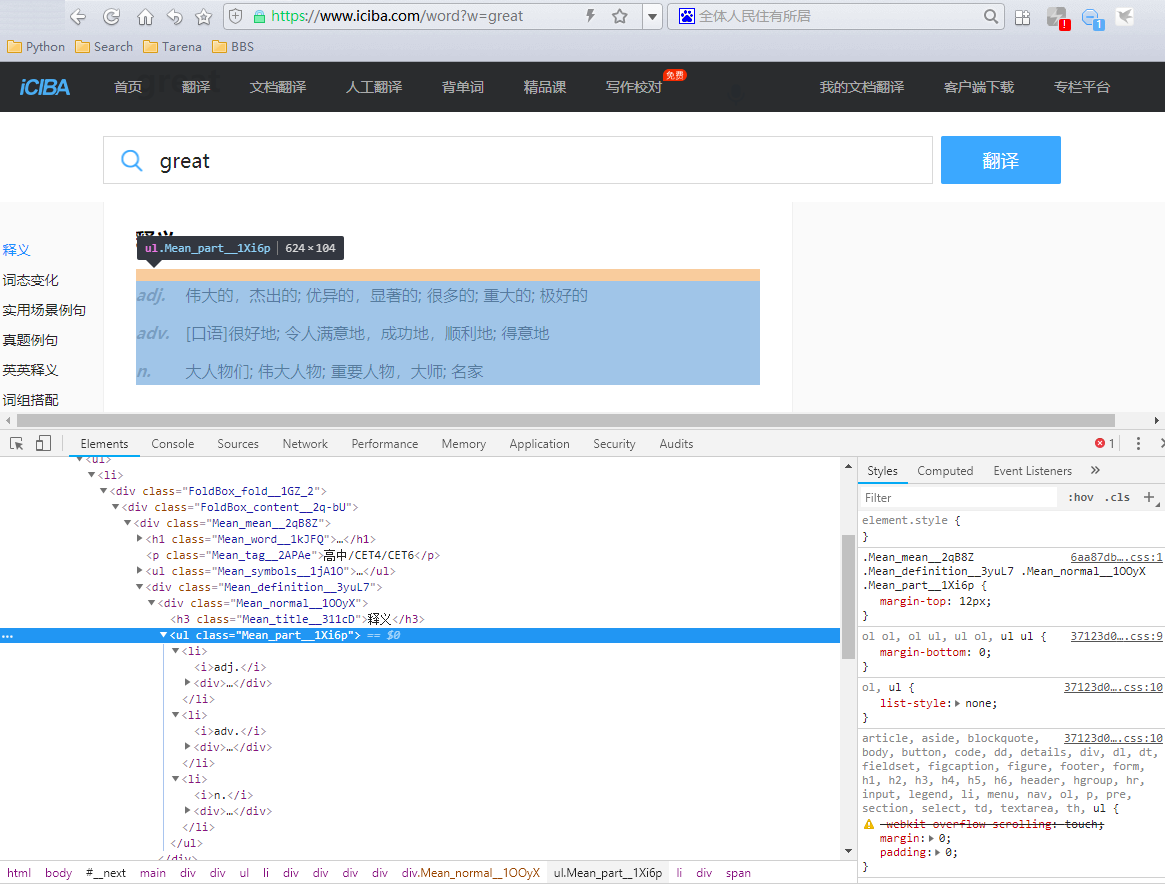
爱词霸的页面元素如下图所示:
实现SearchThread类的run()方法:
public class SearchThread extends Thread {
    ...
    @Override
    public void run() {
        List<Entry> result = new ArrayList<>();

        try {
            Document doc = Jsoup.connect("https://www.iciba.com/word?w="
                + word.toLowerCase()).get();

            for (Element li : doc.getElementsByClass(
                "Mean_part__1Xi6p").first().getElementsByTag("li")) {
                String partOfSpeech = new String();
                String meaning = new String();

                try {
                    partOfSpeech = li.getElementsByTag("i").first().text();
                }
                catch (Exception exception) {}
                try {
                    meaning = li.getElementsByTag("div").first().text();
                }
                catch (Exception exception) {}

                result.add(new Entry(partOfSpeech, meaning));
                store.executeSql(
                    "insert into t_words(word, part_of_speech, meaning) values(?,?,?)",
                    new String[] {word, partOfSpeech, meaning});
            }
        }
        catch (Exception exception) {}

        if(callback != null)
            callback.onResult(result);
    }
}
4.10 查询远程词库
在common包中添加EventHandler类的子类ResultEventHandler:
public class ResultEventHandler extends EventHandler {
    public static final int RESULT_EVENT = 100;

    private List<Entry> result;
    private Text txtResult;

    public ResultEventHandler(EventRunner runner, List<Entry> result,
        Text txtResult) {
        super(runner);

        this.result = result;
        this.txtResult = txtResult;
    }

    @Override
    protected void processEvent(InnerEvent event) {
        super.processEvent(event);

        if (event.eventId == RESULT_EVENT) {
            if (!result.isEmpty()) {
                txtResult.setText("");
                for (Entry entry : result)
                    txtResult.append(entry.getPartOfSpeech() + " " +
                        entry.getMeaning() + "\n");
            }
            else
                txtResult.setText("很遗憾,没查到。╮(╯ɛ╰)╭");
        }
    }
}
为Search类添加remote()方法:
public class Search {
    ...
    public void remote(String word, ResultCallback callback) {
        new SearchThread(word, store, callback).start();
    }
    ...
}
在MainAbilitySlice类的onStart()方法中,为“搜索”图像的点击事件处理添加远程查词功能:
public class MainAbilitySlice extends AbilitySlice {
    ...
    @Override
    public void onStart(Intent intent) {
        ...
        imgSearch.setClickedListener( component -> {
            if (imgCover != null) {
                ...
                if (!result.isEmpty()) {
                    ...
                }
                else {
                    txtResult.setText("查询远程词库。。。");
                    search.remote(tfWord.getText(),
                        new ResultCallback() {
                            @Override
                            public void onResult(List<Entry> result) {
                                new ResultEventHandler(
                                    EventRunner.getMainEventRunner(),
                                    result, txtResult).sendEvent(
                                    ResultEventHandler.RESULT_EVENT);
                            }
                        });
                }
            }
        });
    }
    ...
}
为了获得访问网络的权限,在config.json中添加:
"reqPermissions": [
  {
    "name": "ohos.permission.INTERNET",
    "reason": "internet",
    "usedScene": {
      "ability": ["com.hotest.dictionary.MainAbility"],
      "when": "always"
    }
  }
]
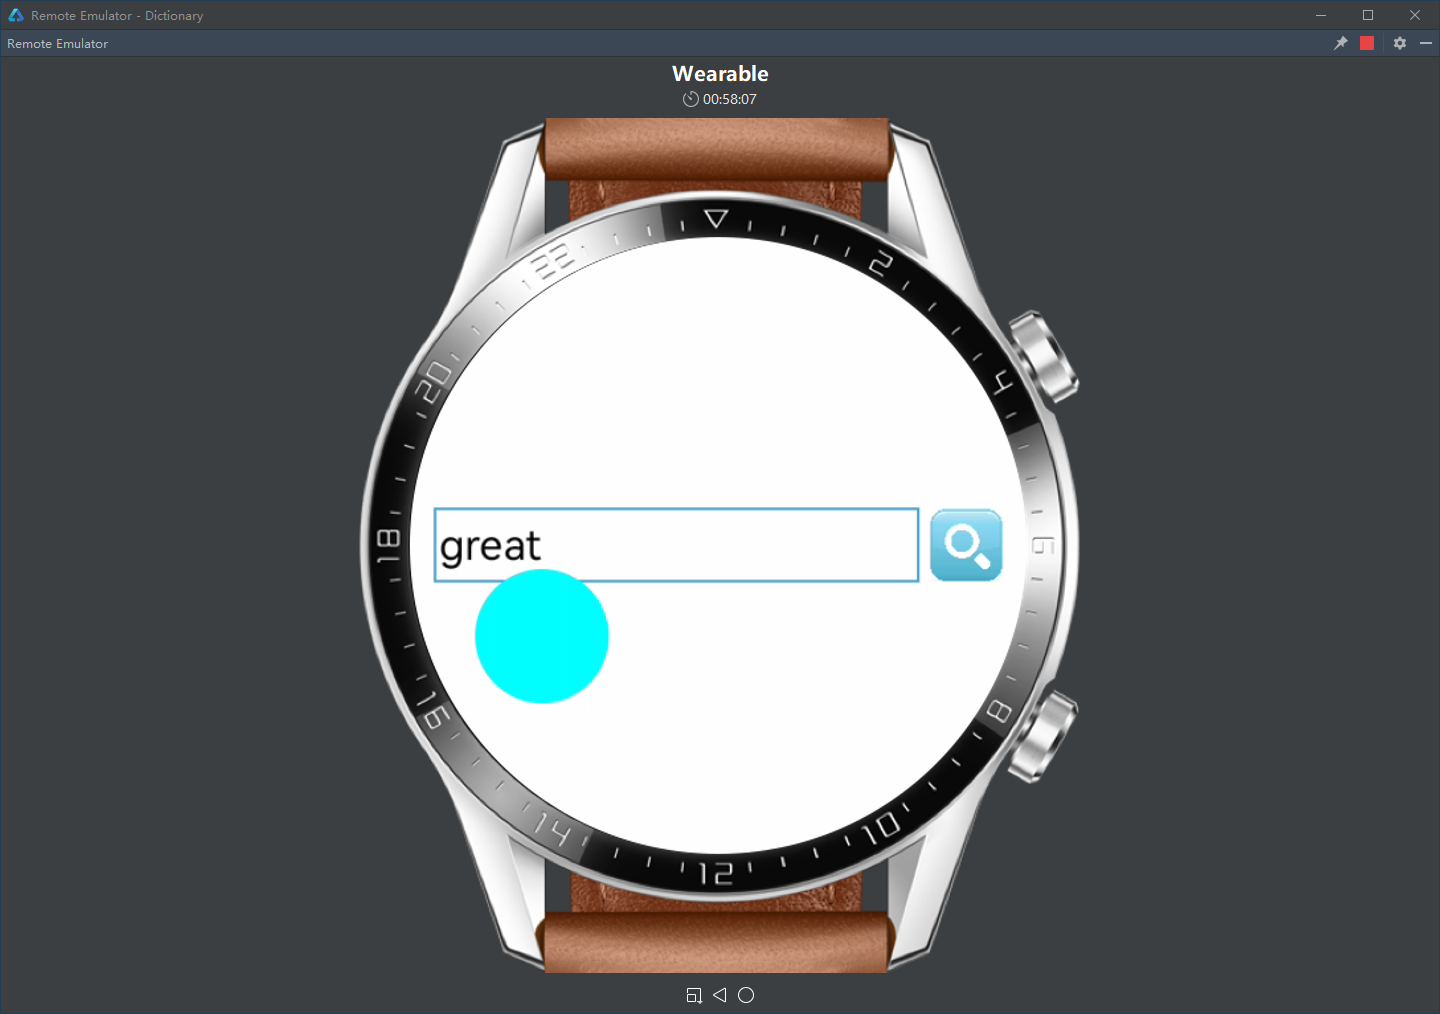
4.11 适配智能手表
添加ResultWearableAbility。
将ResultWearableAbilitySlice中的布局改为Layout_ability_result_wearable:
public class ResultWearableAbilitySlice extends AbilitySlice {
    @Override
    public void onStart(Intent intent) {
        ...
        super.setUIContent(ResourceTable.Layout_ability_result_wearable);
    }
    ...
}
删除Layout_ability_result_wearable2和ResultWearableAbility。
删除config.json中的:
{
  "orientation": "unspecified",
  "name": "com.hostest.dictionary.ResultWearableAbility",
  "icon": "$media:icon",
  "description": "$string:resultwearableability_description",
  "label": "$string:entry_ResultWearableAbility",
  "type": "page",
  "launchType": "standard"
}
在MainAbilitySlice类onStart()方法中,为if (imgCover != null)增加else分支,跳转到ResultWearableAbilitySlice,同时传递参数:
public class MainAbilitySlice extends AbilitySlice {
    ...
    @Override
    public void onStart(Intent intent) {
        ...
        imgSearch.setClickedListener( component -> {
            if (imgCover != null) {
                ...
            }
            else {
                IntentParams params = new IntentParams();
                params.setParam("search", search);
                params.setParam("word", tfWord.getText());
                present(new ResultWearableAbilitySlice(),
                    new Intent().setParams(params));
            }
        });
    }
    ...
}
在ResultWearableAbilitySlice类的onStart()方法中触发查询:
public class ResultWearableAbilitySlice extends AbilitySlice {
    private Text txtResult;

    @Override
    public void onStart(Intent intent) {
        ...
        IntentParams params = intent.getParams();
        Search search = (Search)params.getParam("search");
        String word = (String)params.getParam("word");

        txtResult = (Text)findComponentById(
            ResourceTable.Id_txtResult);

        List<Entry> result = search.local(word);
        if (!result.isEmpty()) {
            txtResult.setText("");
            for (Entry entry : result)
                txtResult.append(entry.getPartOfSpeech() + " " +
                    entry.getMeaning() + "\n");
        }
        else {
            txtResult.setText("查询远程词库。。。");
            search.remote(word, new ResultCallback() {
                @Override
                public void onResult(List<Entry> result) {
                    new ResultEventHandler(
                        EventRunner.getMainEventRunner(),
                        result, txtResult).sendEvent(
                        ResultEventHandler.RESULT_EVENT);
                }
            });
        }
    }
    ...
}
运行效果如下图所示:

4.12 真机部署
在AppGallery上发布,通过自动签名部署到真机。
5 项目总结
在本实训项目中综合使用了鸿蒙操作系统提供的Java UI框架、SQLite数据库、基于jsoup的远程数据访问、多线程和线程间通信以及多设备适配等关键技术。编程语言是软件开发人员的生存之本。熟练掌握多种开发语言,并在最适当的场合使用最适当的语言,是对软件开发工程师尤其是应用软件开发工程师的起码要求。在本实训项目中,使用Python语言快速地构建本地词库,这比只使用一种编程语言和开发环境完成项目开发要高效得多。一般而言,对运行效率要求不高的场合,以Python、Shell等为代表的脚本化语言最为适合,在对性能要求较高的业务处理中,Java语言堪当此任,而在对性能要求最高的系统底层,则是C和C++的天下。那么如何使用C/C++语言开发各种组件,并在Java UI或JS UI框架下使用呢?我们将在后续课程中和大家分享。